Introduction
This article describes how to configure the Client Portal Branding in the PGM system, so the first page that is seen by your customers, with your company's logo, chosen photo and main and second color, which applies to all the tabs later.

Instruction
Go to the PGM -> Settings -> Client Portal Branding.
1. Logo Tab - please select:
A. Header Background Color - Choose the appropriate color for your header (in HEX format: #xxxxxx)
B. Logo - Prepare and upload your logo file (high resolution image, the image file type should be in the vector format: .svg, .pdf or .png, the max height is 60px and max width is 200px)
C. Logo size - Choose this setting to customize the size of your logo.
Please, note that this is the largest possible logo available for setting in our system.


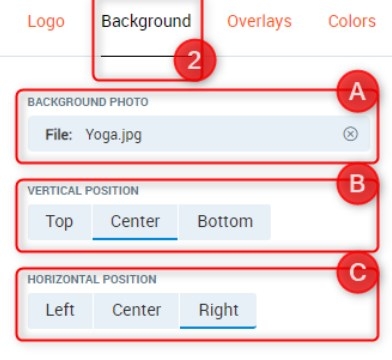
2. Background Tab - please select:
A. Background Photo - Prepare and upload the file for your background photo in the JPG format, which should weigh less than 500kb, otherwise loading the first page of CP2 would take a long time. The ideal photo resolution format is 1980x1080x
B. Vertical Position - This setting let you adjust a Vertical Position for your photo
C. Horizontal Position - This setting let you adjust a Horizontal Position for your photo
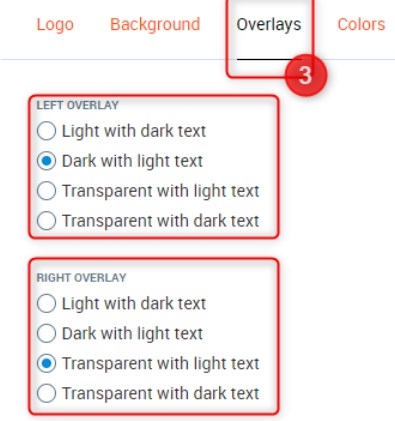
3. Overlay Tab:
Left and Right Overlay - With this setting, you can customize the left and right side of the displayed panel. Choose the most suitable design for you which is displayed in the preview window.
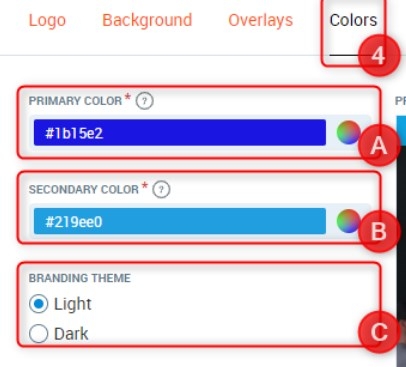
4. Colors Tab - please select:
A. Primary Color - This setting lets you adjust the Login button color (in HEX format: #xxxxxx)
B. Secondary Color - This setting adjusts the font color on Join now! button (in HEX format: #xxxxxx)
C. Branding Theme - With this setting, you can adjust the Light or Dark background color of Login and Passwords buttons
5. Save your Client Portal Branding Application changes by clicking on the Save settings button.
6. To transfer directly to the Client Portal application click on the Open Client Portal button.

Note
Be patient, it could take a few minutes before your changes will upload on your Client Portal Application.
Please, have in mind that you can change it any time!
You are also able to change description that you see in the Client Portal by using the Custom Translation option. Go here to find more information.
Want some more? Please contact our Sales department to prepare an offer based on your club requirements.